| Issue |
Int. J. Simul. Multidisci. Des. Optim.
Volume 12, 2021
Computation Challenges for engineering problems
|
|
|---|---|---|
| Article Number | 21 | |
| Number of page(s) | 13 | |
| DOI | https://doi.org/10.1051/smdo/2021018 | |
| Published online | 21 September 2021 | |
Research Article
Experimental investigations and finite element analysis of milling of Inconel 718 alloy
Department of Mechanical Engineering, Sri Sivasubramaniya Nadar College of Engineering, Kalavakkam 603 110, Tamil Nadu, India
* e-mail: This email address is being protected from spambots. You need JavaScript enabled to view it.
Received:
10
January
2021
Accepted:
10
August
2021
Abstract
Super-alloys encompass great challenges in machinability. One such alloy of much interest in applications is Inconel 718. Its increased hardness, low thermal diffusivity and high temperature strength make it desirable for applications, at the same time rendering its machining a demanding task. Extensive studies have been performed on machinability of Inconel 718, from the turning process stand-point. However, there is found to be a comparative dearth of work on the milling process. Taking into account the versatility of end-milling within the family of milling processes and the research gap, we found that a parametric optimization (aimed at minimum machining forces) of end-milling would be a meaningful effort. An experiment was conducted to study conditions that would help us achieve the same. In our further quest for optimization, chip morphology studies using SEM occupied a special place. Bearing in mind immense prediction capabilities of computer simulations based on FEA available today, we attempted process replication of the experimental work. The significant cutting forces were chosen as the benchmark factor for this purpose and proper attention was given to validation of the FEM created. Such FEM holds promise of being resourceful to drive up efficiency, with consequent spill-over to the production line.
Key words: Inconel 718 / machinability / process optimization / milling / end-milling / chip morphology / prediction capabilities of FEA / validation of FEM
© A.C. Kuriakose et al., Published by EDP Sciences, 2021
 This is an Open Access article distributed under the terms of the Creative Commons Attribution License (https://creativecommons.org/licenses/by/4.0), which permits unrestricted use, distribution, and reproduction in any medium, provided the original work is properly cited.
1 Introduction
Inconel 718 is a Nickel-Chromium-Molybdenum alloy designed to resist a wide range of severely corrosive environments, especially pitting and crevice corrosion. This Nickel-Steel alloy also displays exceptionally high Yield, Tensile, and Creep-Rupture properties at high temperatures. Nickel-base super-alloys like Inconel are generally known to be one of the most difficult- to-machine materials because of their high hardness, strength at elevated temperatures, and low thermal diffusivity. Inconel is also a difficult metal to shape, using traditional cold forming techniques, due to rapid work-hardening. However, in view of extensive applications of such alloys, any attempt at optimizing their machining would be a reward in itself. Today, research work on machining modeling has a focus on predictive ability and is most concentrated in the turning process of metal removal. Important factors of machining such as Cutting Forces, Temperatures, Chip Configuration, Strains and Stresses, if estimated before actual cutting on a machine tool, are seen to cut down unwanted costs to a great extent. Choosing from among the family of milling processes, the versatile end-milling, where there was a comparative lack of research work regarding combined optimization of experimental parameters, we conducted an experiment towards that end and then performed DOE (Design of Experiments) Analysis and ANOVA (Analysis of Variance) on results. As a matter of additional interest, machining chips were subjected to examination with SEM (Scanning Electron Microscopy) for more insights into the cutting process at some selected conditions. Wanting to tap into the modern ability of process simulation of computers, we also embarked on sincere work to simulate the experiment of end-milling by using suitable FEA (Finite Element Analysis) tool. After validation by three methods (comparison with the previous experimental data, performing theoretical parametric extrapolation and chip thickness correlation), the accuracy of FEM (Finite Element Modeling) could be vouched. This model could then be also used for prediction of machining parameters in any range of acceptable regions, which was then undertaken. All results were then put into perspective.
2 Methods
Following paragraphs explain the 4 adopted methods in sequence: 1. Experiment and DOE 2.Chip Study 3. FEA (Setup and Solution) 4. FEA Validation (Experimental Value Comparison, Material Model Extrapolation and Chip Dimensional Evaluation).
In any machining process, the main parameters are Cutting Speed (or Cutting Velocity), Feed Rate (or Worktable Movement Rate) and Depth of Cut (or Per Machining Pass Depth). However as far as end-milling process is concerned, Depth of Cut as a changing input variable is seen to be not of much significant impact, as evident in literature ideas [1]. So we chose rather to keep it constant at 0.5 mm. Then we are left with Cutting Speed and Feed Rate as impactful input variables. Our output variables were chosen to be Forces of Milling (Cutting Force and Feed Force, both horizontal in orientation, leaving out Thrust Force in vertical direction due to it being negligible in end-milling, at constant depth of cut condition), while our input variables were taken as Cutting Speed (in ‘revolutions per minute, rpm’, controlled by setting Spindle Speed of the Vertical Milling Machine) and Feed Rate (in ‘millimeter per minute, mm/min’, controllable by engaging suitable gear combinations in Work-Table Feed arrangement). For the chosen L-9 orthogonal array of machining parameters with three levels (low, medium and high) [2] each in the two input variables (Fig. 1), a suitable size of Inconel 718 plate (Fig. 2) was acquired (150 × 80 × 10, all in mm) along with a compatible Tungsten Carbide (WC) tool [3,4] of diameter 12 mm (Fig. 3). Then, the experiment (Fig. 4) was performed for chosen conditions and the trends obtained in Machining Forces from Tool-Force Dynamometer (Fig. 5) compared with standard test results [5]. Finally, a statistical study involving DOE Analysis and ANOVA was performed on results obtained by experiment [6], using Minitab, to investigate the causal relationships that were statistically significant.
Chip morphology is an important aspect in the evaluation of machinability of Inconel 718. Such studies can help determine the nature of machining efficiency at the microstructural level. Along with that, a lot of other insights into material behavior in metal cutting can be obtained with the likes of Chip Reduction Coefficient and features in the cross sectional area of chip [7]. For the present work, the metal chips of Inconel 718 collected after experiments were chosen selectively at specific points of interest in machining parameter ranges to investigate the microstructural level implications [8] of the end-milling process by SEM. For instance, we could observe in various samples of the present work, tubular helix shaped chips with rough surface, segmented chips with abrasive saw-toothed edges, serrations and closely spaced shear bands. All these could give indications of phenomena like shear instability, adiabatic shearing and localization of shear.
After chip morphological studies, FEA was sought to be applied to the end-milling process with a view to simulating using suitable software. Deform 3D appeared an ideal choice due to its obvious capabilities [1]. Adequate attention was given to previous studies and their limitations [9]. In the FEA formulation (Tab. 1), relevant input data like nature of work-tool interaction (friction factor and heat transfer coefficient), dimensional data and element type were carefully entered after proper study [10]. The Lagrangian analysis along with 4-noded, 3D Tetrahedral Element was used, reposing faith in its advantage to fit to complex arbitrary shaped geometry and consequent control of distortion of elements to a greater extent. The software options (Figs. 6–9) available under boundary conditions (for experimental parameters), material (Johnson-Cook, or JC for short) [4] and friction (Usui) models, contact definition and chip separation criteria were examined before solving our Finite Element Model. After solution, in the post-processing, several relevant output results of FEA, crucial of which included Cutting Force (the main object of interest in this paper), were obtained, including predictive solutions.
After the FEA solution, came the need for validation of FEM utilized. The first apparent choice was direct comparison with experimental force values, which was satisfactory in our case. Another way to validate the model would be to numerically extrapolate the equation of the material model (JC model) and then try to evaluate by comparison, the stability of predictive solutions of FEM. This was done using MS Excel (Fig. 10), with reasonable empirical assumptions of parameters in the JC Model (Tab. 2) for required operating ambient temperature range (by varying ‘T’). Remarkable convergence was seen in this step of evaluation too. In addition, another way to vouch for the dimensional correctness of FEM formulated was to match the chip thickness given by the software using ‘Ruler’ option in the post-processing window (Fig. 11) with actual measurements of corresponding chip samples using a digital micrometer. An index called Chip Dimensional Ratio (CDR), obtained by dividing critical chip dimension by depth of cut, was calculated for both the software values and measured sample values, later to be compared. This again proved satisfactory. Thus, validation of FEM was done in three methods, in all.
Material Flow Stress (MPa) at Ambient Temperature ‘T’ (K),
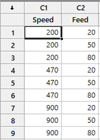 |
Fig. 1 L9 array. |
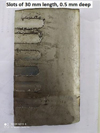 |
Fig. 2 Work-piece. |
 |
Fig. 3 Cutting tool. |
 |
Fig. 4 Vertical milling machine. |
 |
Fig. 5 Display unit of tool force dynamometer. |
FEA formulation.
 |
Fig. 6 Combined tool-work system after meshing. |
 |
Fig. 7 Process setup (tool travel length). |
 |
Fig. 8 Process setup (physical boundary conditions). |
 |
Fig. 9 Process setup (material modeling). |
 |
Fig. 10 Snapshot from MS Excel parametric extrapolative values of material flow stress, for ambient temperature T = 303 K (For FEM Validation-II). |
JC model parameters (For FEM Validation-II).
 |
Fig. 11 Critical chip dimension by ruler option from deform 3D Software (For FEM Validation-III). |
3 Results and discussion
The first set of experimental results is the Force Values (Tab. 3) and their corresponding graphical plots (Figs. 12–17). The standard trend of Cutting Forces against Cutting Speed is one of decreasing nature, owing to thermal softening of specimen undergoing cutting [5]. This is by and large true in our case, as can be seen in the plots (Figs. 12–14). The only exception is some midpoints in the Cutting Speed range and the high Feed Rate plot (Fig. 14) where the reverse (increasing) trend is observed for Cutting Force, Fx. This reverse trend is a case of anomalous behavior. Similarly, the standard trend of Cutting Forces against Feed Rate is one of increasing nature, owing to heavier metallic load on the tool [5]. The same is seen in our case (Figs. 15–17), except when venturing into the high Feed Rate regime, where anomaly kicks in. As high Cutting Force (Fx) is detrimental from the standpoint of tool life as well as process stability, we conclude that the regime of high Feed Rates, where such behavior is prone to occur, is not recommendable for Inconel 718 end-milling.
Experimental results (force values).
 |
Fig. 12 Forces vs cutting speed at 20 mm/min. |
 |
Fig. 13 Forces vs cutting speed at 50 mm/min. |
 |
Fig. 14 Forces vs cutting speed at 80 mm/min. |
 |
Fig. 15 Forces vs feed rate at 7.54 m/min. |
 |
Fig. 16 Forces vs feed rate at 17.7 m/min. |
 |
Fig. 17 Forces vs feed rate at 33.9 m/min. |
3.1 Graphs of data from experimental results
3.1.1 Results from statistical studies in Minitab
The second set of results involves the twin of statistical studies (DOE Analysis and ANOVA) in Minitab, of which only those with significant implications are being given here (Figs. 18–23). From the Main Effects plots of DOE Analysis (Figs. 18 and 20), it is clear that the dominant parameters of influence for Cutting Force (Fx) and Feed Force (Fy) are Feed Rate and Cutting Speed respectively. This is because the plots show grander spatial inclination (indicating greater magnitude of change) in the mentioned pair regions. From the Interaction plots of DOE Analysis (Figs. 19 and 21), it is observed that inter-parametric influence (interaction between Cutting Speed and Feed rate) is seen to be relatively higher in the case of Feed Force (Fy) than on Cutting Force (Fx). This is due to the fact that in these plots, the lines show greater divergent trends (in terms of comparative slopes) in the graphs corresponding to Feed Force (Fig. 21) rather that the other one (Fig. 19). Since Cutting Force (Fx) is a critical response variable, it is pertinent to investigate the statistical significance of influence by its dominant parameter (Feed Rate from DOE Analysis). So ANOVA of Cutting Force (Fx) against Feed Rate becomes appropriate to be conducted. From the ANOVA table (Fig. 22), since p-value (0.001) is less than level of significance (α = 0.05) for 95 % confidence, null hypothesis gets rejected. What this means is, statistically significant influence of Feed Rate on Cutting Force, Fx (alternative hypothesis). Further from pair-wise post-ANOVA comparisons by Tukey's method (Fig. 23), it is seen that Medium Feed Rate range influences Cutting Force (Fx) more than other ranges (low and high) grouped together.
For the second phase of work dealing with SEM of machining chips, the results are for four experimental conditions. The first speed (3.77 m/min) shows short chips having tubular, helical shape, a shear crack and generally rough surface with poor finish (Figs. 24 and 25). The shape at this speed may be attributed to shear instability. The second speed (7.54 m/min) results in small, smooth chips with closely-spaced shear bands (Figs. 26 and 27). Thermal softening phenomenon is known to cause shear bands and smoothness of chips indicates optimality of cutting conditions. At the third speed (17.7 m/min), the chips exhibit segmentation and abrasive saw-toothed edges (Figs. 28 and 29). Segmentation is an indication of cross-over of thermal softening boundary to material fracture condition, while saw-toothed edges hint at localized shear, partly owing to machine vibration and chatter. The fourth (33.9 m/min) condition gives rise to chips that are discontinuous, short, helical, serrated and having occasional splits at end (Figs. 30 and 31). Serration is caused by a truncated free surface crack propagation over the chips at intense compressive machining forces.
The crux of our work falls in the third phase of FEM simulation. The primary results of interest are Cutting Force (Fx) and Feed Force (Fy). Though any number of secondary results can be obtained using FEA, we restrict ourselves to Tool-Work Interface Temperature alone, as this one has a significant bearing on tool life and stability of process itself. The results provided by the software, Deform 3D, depict primary results of interest (Figs. 32–37, for 3 illustrative selected conditions) as well as secondary (Figs. 38 and 39). One thing to be noted is that FEM can also be used to predict feasibility for imaginary conditions (Figs. 38 and 39). All the parametric settings of the experiment conducted are run in FEM to obtain corresponding results and then tabulated for comparison (Tab. 4). Reasonable convergence is seen here and thus completes the first method of FEM validation. Two other methods are in sequence next.
 |
Fig. 18 Main effects plot for cutting force, Fx. |
 |
Fig. 19 Interaction plot for Cutting Force, Fx. |
 |
Fig. 20 Main effects plot for feed force, Fy. |
 |
Fig. 21 Interaction plot for Feed Force, Fy. |
 |
Fig. 22 ANOVA table for dominance in cutting force (Fx). |
 |
Fig. 23 Pair-wise results after ANOVA test. |
 |
Fig. 24 For cutting speed = 3.77 m/min. |
 |
Fig. 25 For cutting speed = 3.77 m/min. |
 |
Fig. 26 For cutting speed = 7.54 m/min. |
 |
Fig. 27 For cutting speed = 7.54 m/min. |
 |
Fig. 28 For cutting speed = 17.7 m/min. |
 |
Fig. 29 For cutting speed = 17.7 m/min. |
 |
Fig. 30 For cutting speed = 33.9 m/min. |
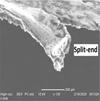 |
Fig. 31 For Cutting Speed = 33.9 m/min. |
 |
Fig. 32 Mean cutting force, Fx = 251.67 N. |
 |
Fig. 33 Mean feed force, Fy = 84.76 N. (For Cutting Speed = 7.54 m/min, Feed Rate = 20 mm/min). |
 |
Fig. 34 Mean cutting force, Fx = 327.13 N. |
 |
Fig. 35 Mean feed force, Fy = 50.92 N. (For Cutting Speed = 33.9 m/min, Feed Rate = 20 mm/min). |
 |
Fig. 36 Mean cutting force, Fx = 504.23 N. |
 |
Fig. 37 Mean feed force, Fy = 42.56 N. (For Cutting Speed = 33.9 m/min, Feed Rate = 50 mm/min). |
 |
Fig. 38 Tool-work interface temperature = 849 K. |
 |
Fig. 39 Tool-work interface temperature = 1108 K. (For conditions at 303 K ambience, 1. Feed Rate = 35 mm/min, Rotational Speed = 300 rpm & 2. Feed Rate = 75 mm/min, Rotational Speed = 700 rpm, in respective order). |
Comparison of force values from software and experiment (FEM validation − I).
3.2 Micrographs from SEM for chip morphology
3.2.1 Results from FEA simulation (Deform 3D)
3.2.1.2 Comparison of Stress Values from Software and Extrapolation (FEM Validation − II)
The second FEM validation (Figs. 40 and 41) is by running evaluation of JC Model equation to matching predictive solutions. This verifies that the FEM built is in consonance with the systemic material governing equation. The third final FEM validation is calculative comparison of CDR (Tab. 5), which can vouch for dimensional scale accuracy of FEM formulated. Thus end the three methods of validation of FEM.
 |
Fig. 40 Von-Mises Stress = 1190 Mpa. |
 |
Fig. 41 Von-Mises Stress = 448 Mpa. (For conditions at 303 K ambience, 1. Feed Rate = 35 mm/min, Rotational Speed = 300 rpm, JC Model gives 1193.38 MPa & 2. Feed Rate = 75 mm/min, Rotational Speed = 700 rpm, JC Model gives 439.28 MPa; in respective order). |
Comparison of CDR from software and experiment (FEM Validation − III).
4 Conclusions
The following are the conclusions drawn from results of our work:
-
Though variation in Cutting Forces throughout the experimental runs appeared to be of random nature, and hence statistically insignificant to establish correlation by ANOVA, Feed Rate is seen to significantly influence Cutting Force, as revealed by DOE Analysis results. Further by graphical plots, we concur that High Feed Rates are not at all advisable for the end-milling process of Inconel 718.
-
Exhaustive investigation into the cutting process of end-milling, by way of chip morphology studies using SEM images of machining chips from experiment, made us realize that medium Cutting Speeds appear favorable to milling of Inconel 718. This is because on the lower end of the Cutting Speed spectrum, there is possibility for a rough surface finish, while on the higher end, chip serrations, split and saw tooth faced chip edges may impede efficient end-milling.
-
Successful computer simulation of the end-milling process based on FEA was undertaken, using a suitable software (Deform 3D) followed by sufficient validation of the FEM created by various methods. Good agreement of Forces in Milling between experiment and FEA, consonance of Flow Stress values obtained by predictive modeling with JC Model parametric extrapolation and additional verification by means of CDR stand testimony to the very fact.
-
Optimum experimental conditions of end-milling of Inconel 718, from our overall work are seen to be within the ranges: 20–50 mm/min for Feed Rate and 200–500 rpm for Spindle (Cutting) Speed.
5 Implications and influences
With the ability to simulate on a computer a machining process like end-milling for a critical material (like Inconel 718 or others), and thence also get an idea of the most important determiner of process stability (Cutting Force) as a function of plausible machining parameters (Cutting Speed and Feed Rate), a machinist or manufacturing engineer will be in a better position to leverage optimized experimental conditions. This can in turn, improve overall production output metrics and process efficiency, with a positive spill-over to the entire production line. As to the future scope of study, it may be commented that choice of material for the cutting tool, examination of Fz component (or Depth of Cut) as an additional variable, effect of increased number of machining passes, simulation on other popular FEA tools and newer methods of their validation are some directive clues that may be looked into for extension and augmentation upon the current work.
References
- K. Venkata Rao, B. Bachina Harish Babu, V. Umasai Vara Prasad, A study on effect of dead metal zone on tool vibration, cutting and thrust forces in micro milling of Inconel 718, Alloys Compd. 793 (2019) [Google Scholar]
- M. Rahman, W.K.H. Seah, T.T. Teo, The Machinability of Inconel 718, Mater. Process. Technol. 204, 63–199 (1997) [Google Scholar]
- R. Merugu, S. Datta, Effects of Cutting Speed on Chip Characteristics and Tool Wear Mechanisms During Dry Machining of Inconel 718 Using Uncoated WC Tool, Arab. J. Sci. Eng. 44, 7423–7440 (2019) [Google Scholar]
- U. Necati, A. Cicek, K. Aslantas, Proceedings of the 17th CIRP Conference on Modeling of Machining Operations, Finite Element Simulations of cutting force, torque, and temperature in drilling of Inconel 718 (2019) [Google Scholar]
- M. Alauddin, M.A. Mazid, M.A. El Baradi, M.S.J. Hashmi, Cutting Forces in the end milling of Inconel 718, Mater. Process. Technol. 77, 153–159 (1998) [Google Scholar]
- D. Thakur, B. Ramamoorthy, L. Vijayaraghavan, Optimization of high speed turning parameters of super-alloy Inconel 718 material using Taguchi technique, Indian J. Eng. Mater. Sci. 16, 44–50 (2008) [Google Scholar]
- J. Lorentzona, N. Jarvstrat, B.L. Josefson, Modeling chip formation of alloy 718, J. Mater. Process. Technol. 209, 4645–4653 (2009) [Google Scholar]
- K.S. Vijay Sekar, P.R. Shivaram, K. Sushinder, S.B. Nivedh Kannaa, N. Gupta, Experimental Investigation and Finite Element Analysis of milling of Ti-6Al-4V Titanium alloy by studying cutting forces and chip microstructure, Appl. Mech. Mater. 852 (2016) [Google Scholar]
- A. Del Pretea, L. Filice, D. Umbrello, Proceedings of the 14th CIRP Conference on Modeling of Machining Operations [CIRP CMMO], Numerical Simulation of Machining Nickel-Based Alloys (2013) [Google Scholar]
- P. Angelos, Markopoulos, in Finite Element Method in Machining Processes, Springer- ISBN 978-1-4471-4330-7 [Google Scholar]
Cite this article as: Akhil C. Kuriakose, Raman Balakrishnan, Harsh Vardhan, Krishnaraju Srinivasaraju Vijay Sekar, Experimental investigations and finite element analysis of milling of Inconel 718 alloy, Int. J. Simul. Multidisci. Des. Optim. 12, 21 (2021)
All Tables
All Figures
 |
Fig. 1 L9 array. |
| In the text | |
 |
Fig. 2 Work-piece. |
| In the text | |
 |
Fig. 3 Cutting tool. |
| In the text | |
 |
Fig. 4 Vertical milling machine. |
| In the text | |
 |
Fig. 5 Display unit of tool force dynamometer. |
| In the text | |
 |
Fig. 6 Combined tool-work system after meshing. |
| In the text | |
 |
Fig. 7 Process setup (tool travel length). |
| In the text | |
 |
Fig. 8 Process setup (physical boundary conditions). |
| In the text | |
 |
Fig. 9 Process setup (material modeling). |
| In the text | |
 |
Fig. 10 Snapshot from MS Excel parametric extrapolative values of material flow stress, for ambient temperature T = 303 K (For FEM Validation-II). |
| In the text | |
 |
Fig. 11 Critical chip dimension by ruler option from deform 3D Software (For FEM Validation-III). |
| In the text | |
 |
Fig. 12 Forces vs cutting speed at 20 mm/min. |
| In the text | |
 |
Fig. 13 Forces vs cutting speed at 50 mm/min. |
| In the text | |
 |
Fig. 14 Forces vs cutting speed at 80 mm/min. |
| In the text | |
 |
Fig. 15 Forces vs feed rate at 7.54 m/min. |
| In the text | |
 |
Fig. 16 Forces vs feed rate at 17.7 m/min. |
| In the text | |
 |
Fig. 17 Forces vs feed rate at 33.9 m/min. |
| In the text | |
 |
Fig. 18 Main effects plot for cutting force, Fx. |
| In the text | |
 |
Fig. 19 Interaction plot for Cutting Force, Fx. |
| In the text | |
 |
Fig. 20 Main effects plot for feed force, Fy. |
| In the text | |
 |
Fig. 21 Interaction plot for Feed Force, Fy. |
| In the text | |
 |
Fig. 22 ANOVA table for dominance in cutting force (Fx). |
| In the text | |
 |
Fig. 23 Pair-wise results after ANOVA test. |
| In the text | |
 |
Fig. 24 For cutting speed = 3.77 m/min. |
| In the text | |
 |
Fig. 25 For cutting speed = 3.77 m/min. |
| In the text | |
 |
Fig. 26 For cutting speed = 7.54 m/min. |
| In the text | |
 |
Fig. 27 For cutting speed = 7.54 m/min. |
| In the text | |
 |
Fig. 28 For cutting speed = 17.7 m/min. |
| In the text | |
 |
Fig. 29 For cutting speed = 17.7 m/min. |
| In the text | |
 |
Fig. 30 For cutting speed = 33.9 m/min. |
| In the text | |
 |
Fig. 31 For Cutting Speed = 33.9 m/min. |
| In the text | |
 |
Fig. 32 Mean cutting force, Fx = 251.67 N. |
| In the text | |
 |
Fig. 33 Mean feed force, Fy = 84.76 N. (For Cutting Speed = 7.54 m/min, Feed Rate = 20 mm/min). |
| In the text | |
 |
Fig. 34 Mean cutting force, Fx = 327.13 N. |
| In the text | |
 |
Fig. 35 Mean feed force, Fy = 50.92 N. (For Cutting Speed = 33.9 m/min, Feed Rate = 20 mm/min). |
| In the text | |
 |
Fig. 36 Mean cutting force, Fx = 504.23 N. |
| In the text | |
 |
Fig. 37 Mean feed force, Fy = 42.56 N. (For Cutting Speed = 33.9 m/min, Feed Rate = 50 mm/min). |
| In the text | |
 |
Fig. 38 Tool-work interface temperature = 849 K. |
| In the text | |
 |
Fig. 39 Tool-work interface temperature = 1108 K. (For conditions at 303 K ambience, 1. Feed Rate = 35 mm/min, Rotational Speed = 300 rpm & 2. Feed Rate = 75 mm/min, Rotational Speed = 700 rpm, in respective order). |
| In the text | |
 |
Fig. 40 Von-Mises Stress = 1190 Mpa. |
| In the text | |
 |
Fig. 41 Von-Mises Stress = 448 Mpa. (For conditions at 303 K ambience, 1. Feed Rate = 35 mm/min, Rotational Speed = 300 rpm, JC Model gives 1193.38 MPa & 2. Feed Rate = 75 mm/min, Rotational Speed = 700 rpm, JC Model gives 439.28 MPa; in respective order). |
| In the text | |
Current usage metrics show cumulative count of Article Views (full-text article views including HTML views, PDF and ePub downloads, according to the available data) and Abstracts Views on Vision4Press platform.
Data correspond to usage on the plateform after 2015. The current usage metrics is available 48-96 hours after online publication and is updated daily on week days.
Initial download of the metrics may take a while.


